Quick Start Tutorial
Table of Contents
Launching SILEXX OEMS
After installation, SILEXX OEMS creates a shortcut on the Desktop and a shortcut in the Start Menu. Double-click the shortcut to start the program.
If the shortcuts are deleted, press 'Windows Key + s' to open Windows Search and search for Obsidian. The default directory is in a hidden folder in the user directory "C:\Users\your_windows_username\AppData\Local\Silexx\Obsidian", but this location can be changed during setup.

1. Choosing a Default OEMS Layout
The first time SILEXX OEMS is opened, a window will appear with a selection of premade layouts to choose from. These layouts include common settings and modules for setting up the platform for the first time and act as a good jumping off point for building your own custom layout. Additionally, you can select a default layout anytime via File -> Layouts -> Layout Templates.
1.1 Default Layouts
- Option Trader- This is a perfect layout for someone who is going to be conducting primarily options trading and workflow.
- Equity Trader- This is a perfect layout for someone who is going to be conducting primarily Equities trading and workflow.
- Risk Manager- This is a perfect layout for someone who is going to be overseeing multiple trading accounts.
- Sell-Side Option Trader- A bare-bones template configured for the professional sell-side options trader.

1.2 Saving your Layout
SILEXX OEMS automatically saves your layout when the application is closed, or when the layout is manually saved.
To manually save the layout:
- Click 'File' (Upper Left Hand Corner of the Main Panel)
- Mouse-over 'Layout' and a sub-menu will appear
- Select 'Save Layout'.
1.3 Backing-Up your Layout
Backups are always a good idea when it comes to computers (or Death stars), which is why it's a good idea to back up your layout regularly. Layout backups not only save your configuration in case a torpedo goes down the wrong exhaust pipe, they are also portable between computers. If you need to transfer your layout from your workstation to your laptop, just back up the layout, transfer the backup to the laptop, and import it into the OEMS (covered in the next section).
Within the main panel of the SILEXX OEMS platform complete the following steps:
- Click File (Upper Left Hand Corner of the Main Panel)
- Select the Layout carrot
- Select Backup Layout.
1.4 Importing your Layout
Layouts can be imported from any layout backup file, including other user's layout backup files.
Within the main panel of the SILEXX OEMS platform complete the following steps-
- Click File (Upper Left Hand Corner of the Main Panel)
- Select the Layout carrot
- Select Import Layout
- You will be prompted with a pop-up window stating that "In order to import a layout backup, SILEXX OEMS will have to restart after importing the backup. Do you want to proceed?" Select Yes
2. Column Customization Features
Within Silexx OEMS a staple feature is the ability to customize what columns of information can be displayed within each module that comprises the OEMS platform. We Shall discuss and cover the following:
- Add/ Remove Data Columns
- Re-Order Data Columns
- Resize columns to view truncated data
- Perform Simple Sorting Functions
2.1 Adding and Removing Data Columns
Many of the modules display data in a visual spreadsheet. Not all columns are displayed by default.
- Right Click any column header and select the "Column Chooser" to launch a new column customization Window.
- A customization window will appear
- Double Left Click a column title to automatically place it within the Module
- You Could Also Left-Click and drag the title into a specific location on the header bar
- Arrows will indicate where the new column will be placed in relation to the other columns
- An X will appear on the title as you drag it when it is over an area in which it cannot be dropped

This feature is also a way to remove a column from the spreadsheet. Simply drag the column downward into the spreadsheet until you see the X and release the mouse button
2.2 Re-Order Data Columns
Column Order can be changed through left clicking on a column header and moving header text left or right.

If you see an X appear remember this will remove your column from your existing set up, so ensure through your left and right navigation you do not prematurely delete your column heading by accident.
2.3 Re-sizing Columns
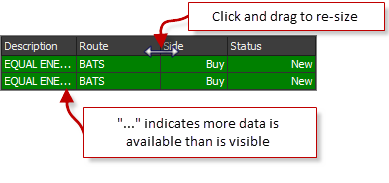
Manual Resizing- Cells within data that is truncated due to the column width are indicated with "..." at the end of the visible text.
- Hover your mouse pointer on the divider bar between column headers until the pointer becomes a double arrow.
- Left- Click and drag to re-size the column to the left of the double arrow.
Auto Resizing- The header bar right-click menu provides options for automatically resizing columns based on the width of the data that is in the cells of the column.
- Best Fit: Re-size a single column (column clicked) based on the widest text in the column.
- Best Fit (all Columns): Re-size all displayed columns based on the widest text in each respective column.
2.4 Sorting Functions
Left-click any column header to sort the entire spreadsheet in ascending or descending order based on the data in the selected column.
3. Order Book & Portfolio
3.1 Order book
-
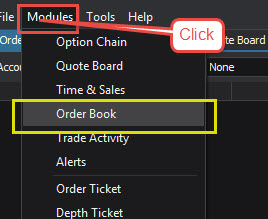
Launching Order Book Module
- Open Modules by navigating via the main OEMS Pain and selecting Modules dropdown
- Order Book Key Features
The Order Book is divided into two sections, Working Orders (upper section) and Filled / Canceled orders (lower section).
From the Order Book you can:
- Track all your orders currently working in the markets
- Create, modify, and cancel orders
- Organize and sort your working and filled orders for easier reference
- View a summary of working and filled orders

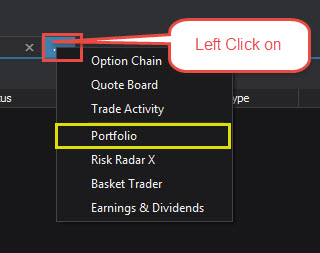
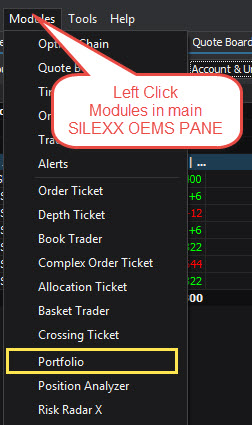
3.2 Portfolio
The Portfolio Module is a part of every bassline layout when initializing SILEXX OEMS, the portfolio serves as your place to see what positions or contracts you may have working. Traditional portfolios break down accounts by symbols, options and stocks for the same underlying asset are not grouped together. Most systems offer little, if any, customization to view your portfolio or limit you to view only one account at a time. This is where SILEXX OEMS differs greatly below are some key features that exist within the portfolio Module.
A. Launching Portfolio Module
- Opening modules via main OEMS Pane windowing using the ellipsis feature
- Opening Modules by navigating via the main OEMS Pain and selecting Modules dropdown
 B. Key Features
- SILEXX OEMS Portfolio module allows for full customization with a simple click of the mouse. Group by accounts, symbols, expirations, account & underlying, etc.
- Realized P&L or Mark-to-Market P&L? What about Trade P&L vs. Net P&L? Is the ability to sort by expiration important? What about post expiration deltas? These are just a few of the Options you can harness within the SILEXX OEMS Portfolio Module
- Ability to input and customize module column layouts, able to save these layouts
- Using traditional expanding trees - you can view overall portfolio information or drill down into detailed information per each individual position
- Theoretical Price Editor feature allows you to make edits to the theoretical price directly from the main Portfolio window using a drop down editor You can change make manual changes on the date, interest rate and make changes to implied volatility

4. Quote Board
The Quote Board is where you view the market. It needs to be clean, easy to read, simple, and have the ability to alert you to sudden changes.
4.1 Launching Quote Module
- Opening modules via main OEMS Pane windowing using the ellipsis feature
- Opening Modules by navigating via the main OEMS Pain and selecting Modules dropdown


4.2 Key Features
- The SILEXX OEMS Quote Board allows the user to effectively track stocks, options, indices and futures - with the ability to launch order tickets and set alerts.
- Built in Security search feature allows you to enter a specific ticker symbol and add them into your quote board.
- Creating your own template with customizable columns and simple "drag drop" technology means customization is just a mouse click away. You are able to save your own templates, add alerts, and specialized filters.

5. Depth Ticket
The Depth Ticket or Level 2 ticket as it may sometimes be called is highly popular and a widely utilized feature within the SILEXX OEMS.
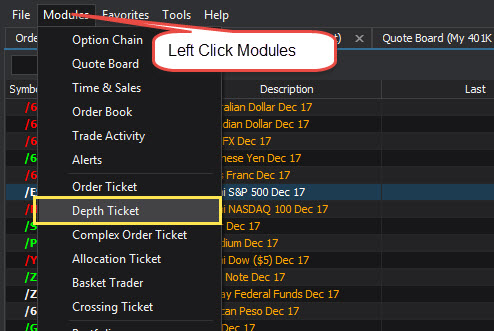
5.1 Launching Depth Ticket Module
- Opening Modules by navigating via the main OEMS Pain and selecting Modules dropdown
5.2 Key Features
- Provides National and Regional BBO (Best Bid Off) information in one complete shot
- Harnesses SILEXX OEMS security search feature to help you garner the correct ticker symbols
- Shows current working orders in relation to current RBBO data
- Ability input a custom display quantity to for "ICEBERG" orders
- Custom Order instructions can be input for Locate information for HTB orders and Short Exempt Orders
- Order Modifiers Panel allows users to incrementally modify the price of their order quickly
- Order Quantity Controls Panel allows users to enter specific amounts and quickly submit quantity changes based on the previously set amount.
- Clearing Instructions Panel allows users to enter specific clearing instructions
- Time and Sales Panel shows the user specific time and sales information; the user is also able to customize columns within this pane via column chooser feature
- Lock Down Buttons toggle for Time in Force(TIF), Quantity, Price and Type, when these buttons are toggled on their associated input fields will not change and the overall ticker symbol is modified
- Custom Hotkey Buttons integrated within Depth ticket for improved trader workflow

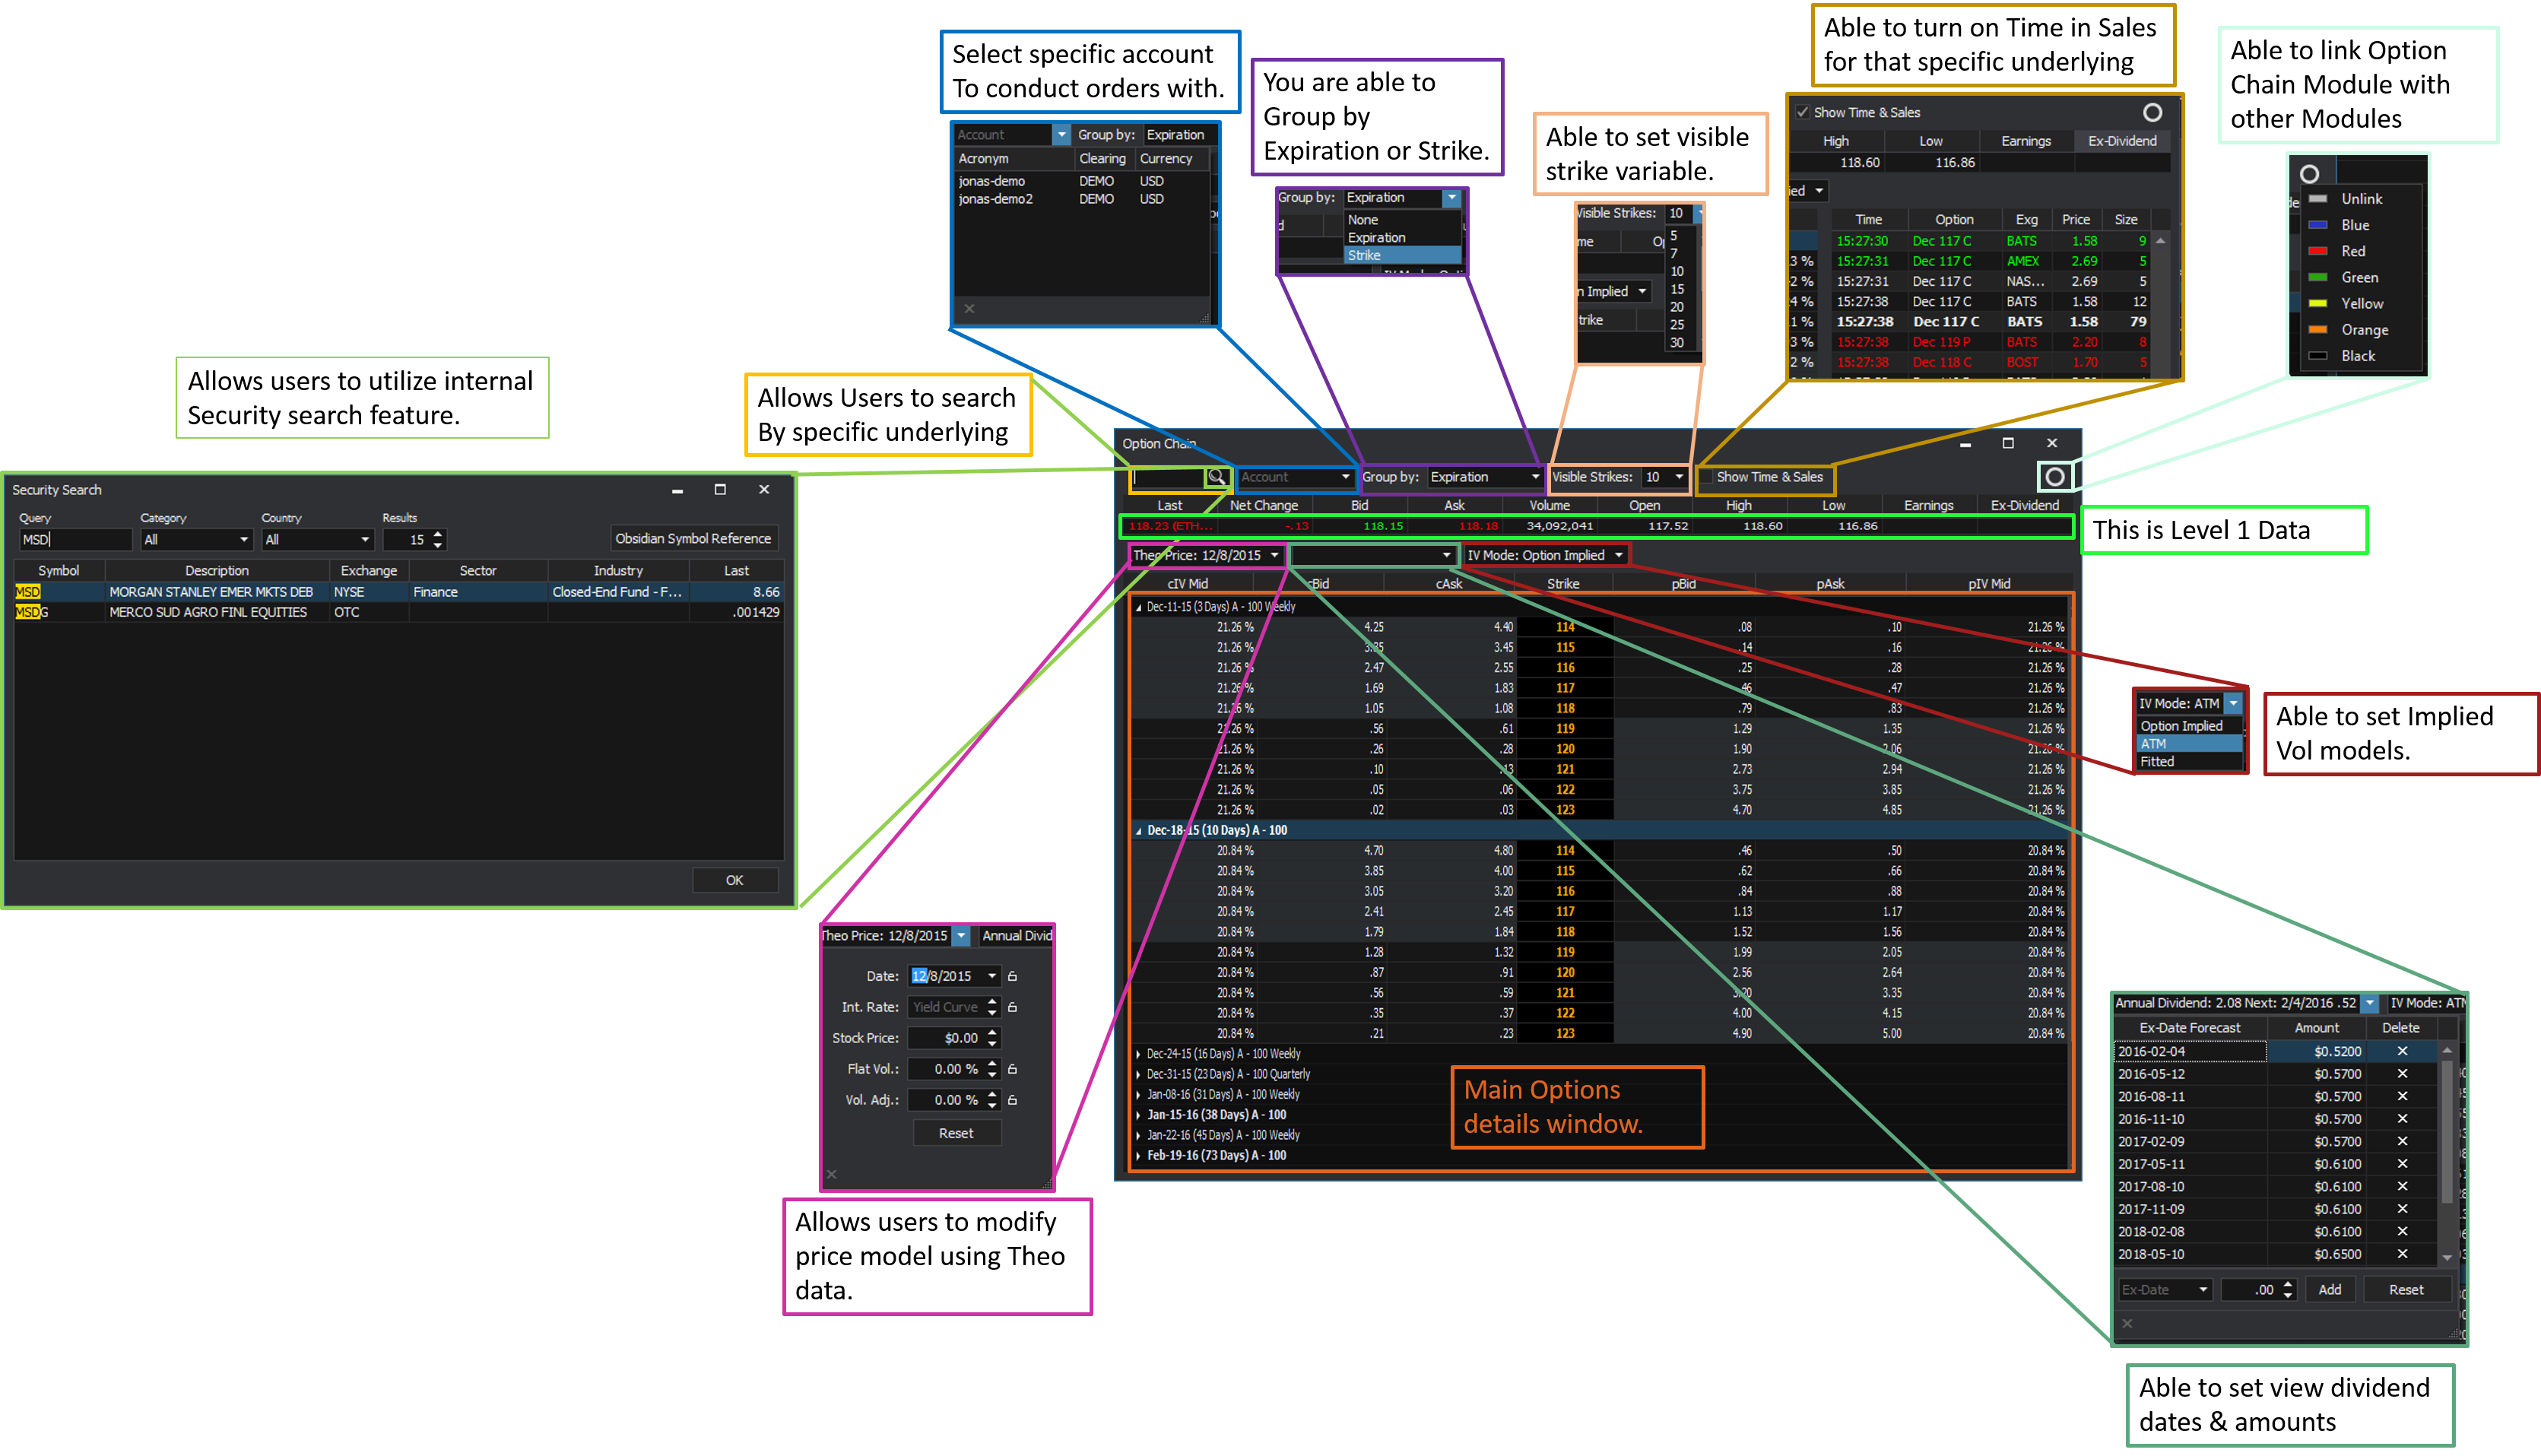
6. Option Chain
6.1 Launching Option Chain Module
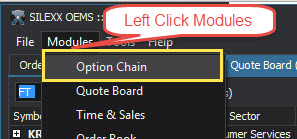
- Opening Option Chain Module via main OEMS Pane windowing using the ellipsis feature
- Opening Option Chain Module by navigating via the main OEMS Pain and selecting Modules dropdown

6.2 Key Features
- Users can define Account input, Group by, Visible Strike parameters.
- Harness SILEXX OEMS Security Search Features.
- Displays National Level BBO information for that specific underlying.
- Displays Regional Level BB information for specific contract and strike point.
- Choose between three unique Implied Volatility Models.
- Harness Built in Multi-Leg Strategies.
- Utilize built in volatility skew feature for theoretical volatility analysis.
- Ability to use right click quick options to see preconfigured layouts and filters.
- Create Custom alerts.
- Link Option Chain to other OEMS modules i.e. Depth Ticket, Order Ticket.
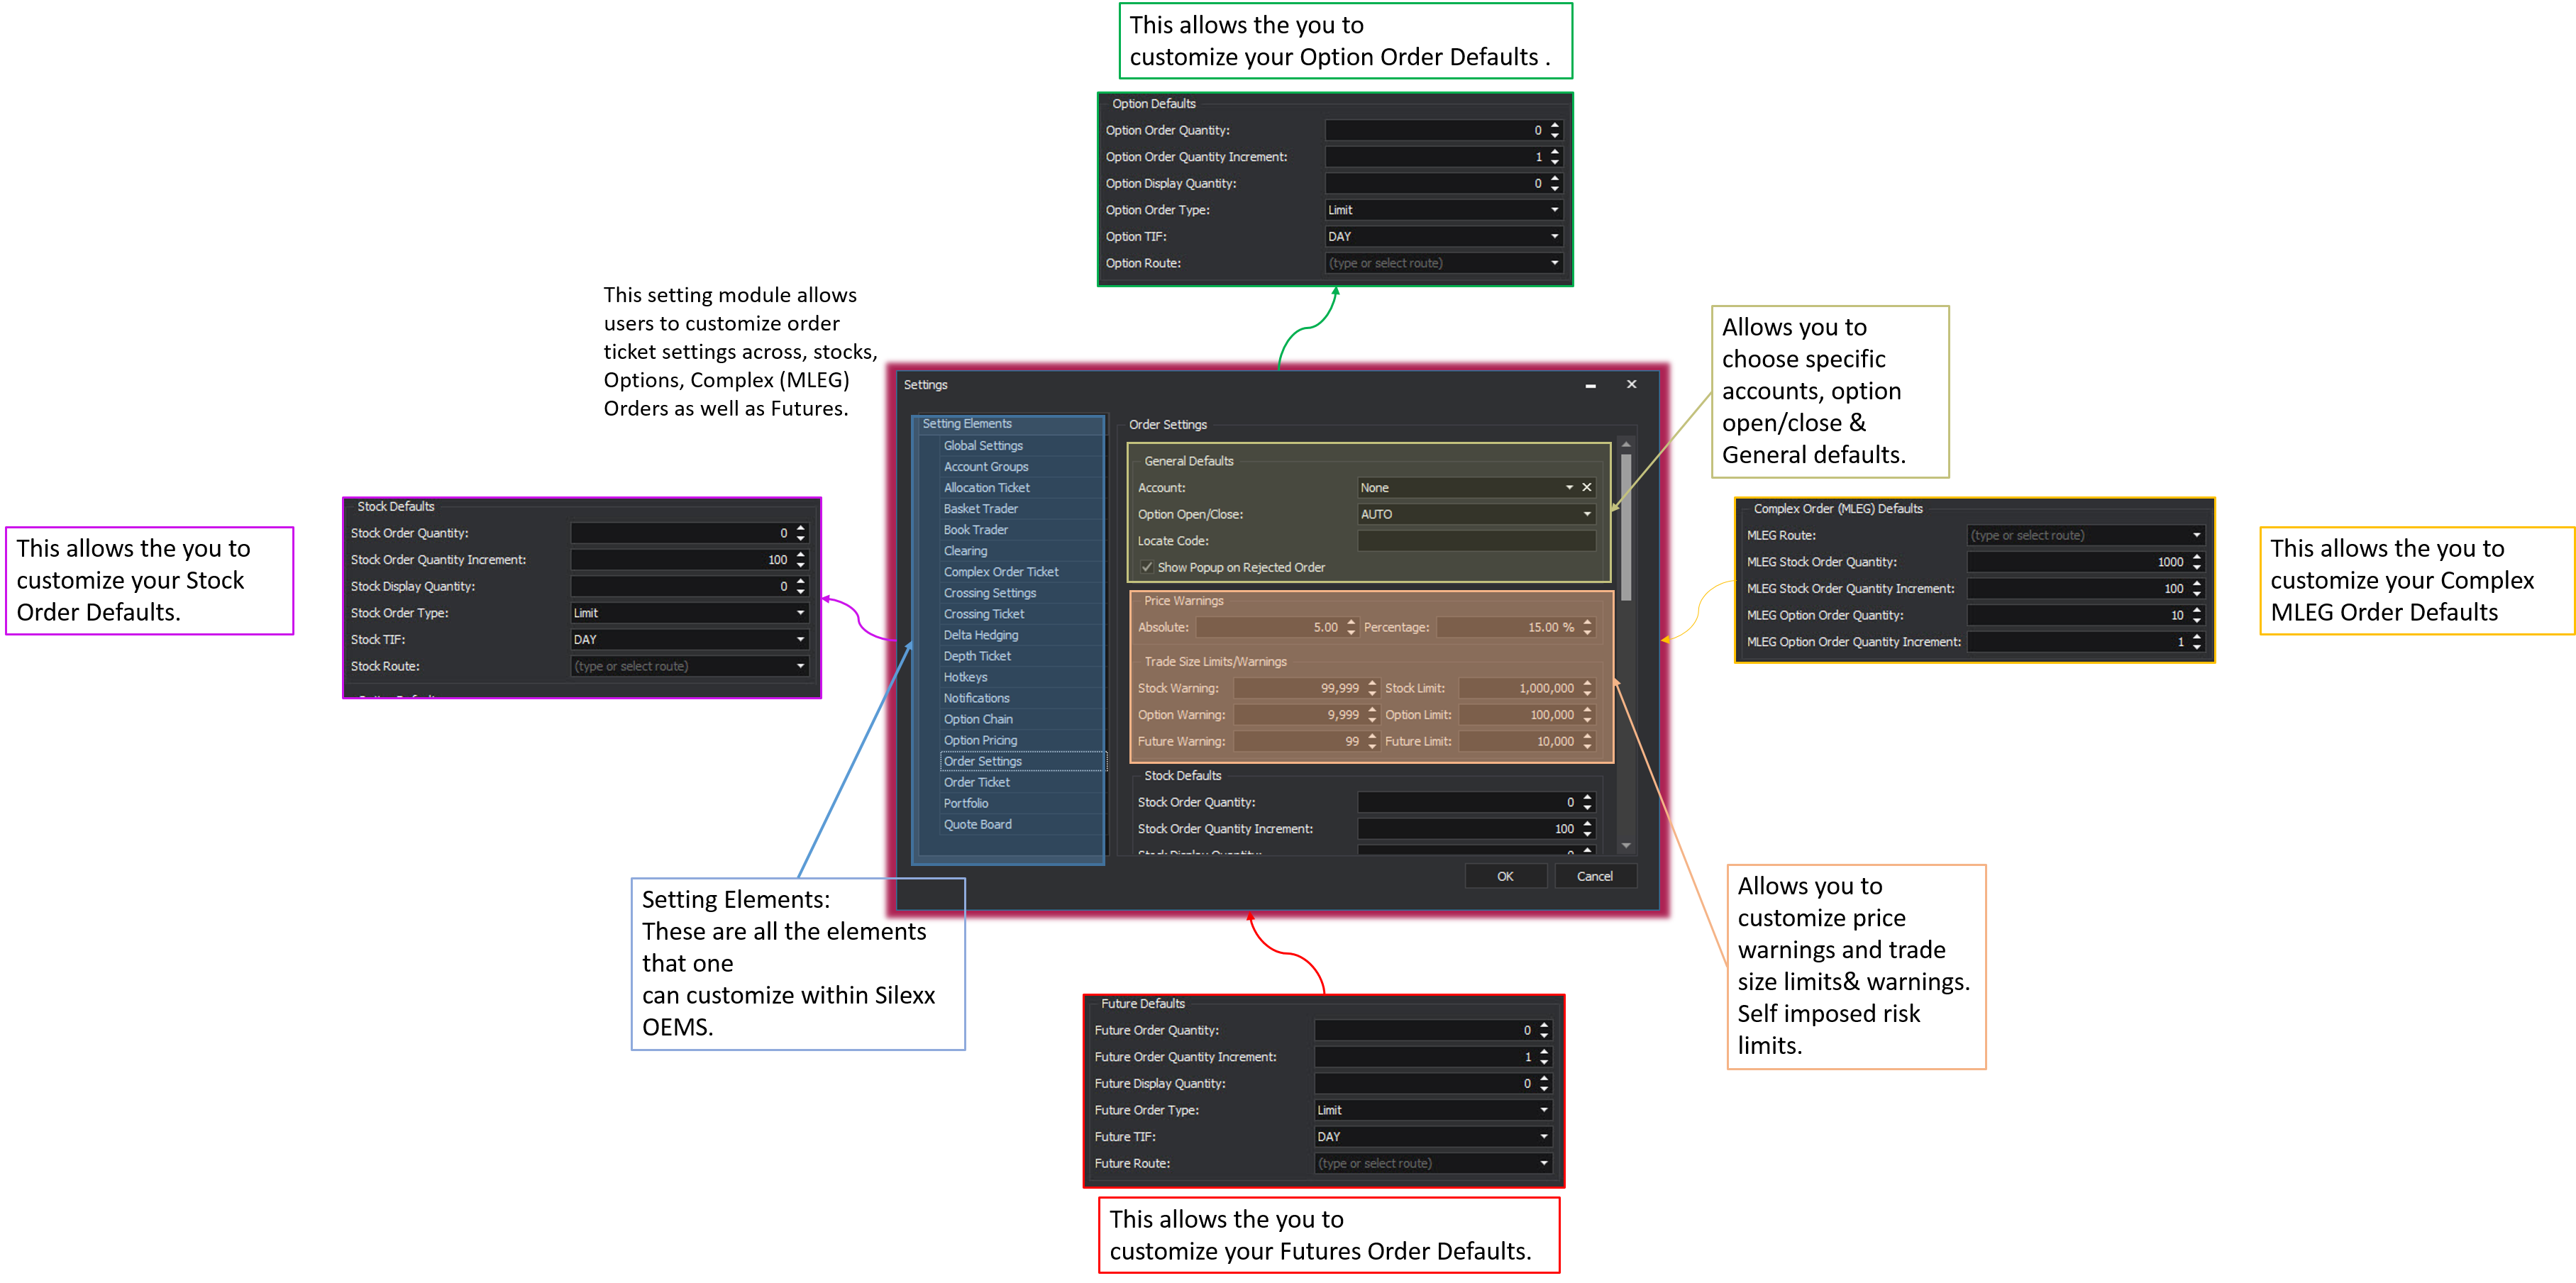
7. Creating Order Ticket Default Settings
One of the more common and frequently asked questions is how do I establish my default settings.
7.1 Opening Settings Feature
- Click File in the top right hand corner of your main OEMS panel
- Select settings
- This will open a new window and display all of the settings options available within SILEXX OEMS Platform
7.2 Order Ticket Default Settings
The Order ticket default settings feature is the answer to many of your initial questions you may have. Now that you have grasped and harnessed the power that is SILEXX OEMS you now want to establish your Order setting defaults. This setting module allows users to customize order ticket settings across, stocks, Options, Complex (MLEG) Orders as well as Futures.
Key Features
- Allows the you to customize your Option Chain Module Order Defaults.
- Allows you to choose specific accounts, option open/close & General defaults.
- Allows the you to customize your Complex MLEG Order Ticket Module Defaults.
- Allows you to customize price warnings and trade size limits& warnings. Self-imposed risk limits.
- Allows you to customize your Stock Order Defaults.